melshort9.etsy.com

my etsy gift shop, with lots of goodies for new babies and mommas

Saturday, July 25, 2009

Poetry and Sarcasm Don't Mix

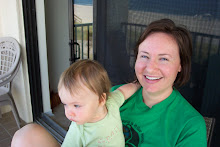
One of my goals as a mother is to expose my baby to everything beneficial and healthy, even if I don't particularly enjoy it. So yesterday I broke out an old book of poetry, thinking I would read her a couple of poems while she scribbled on her AquaDoodle (thanks Uncle Steve). I started reading Mary Oliver's "You Are Standing at the Edge of the Woods," and all of the sudden, I started to cry. Now, I am four months pregnant and not entirely unemotional right now, but that's an odd reaction. And I remembered that poetry has a way of making me burst into tears. I wouldn't say that I love poetry, but I went through the requisite poetry stage when I was about 14. You know, girls, the stage where you would write hearfelt if painfully rhymed verses about life and love, or what you imagine life and love might be about, based on movies.

I have had a bad experience with poetry. In school one time I was forced to write a poem by a well-meaning English teacher, so my friends and I decided to cook up the cheesiest poem we could think of. I don't remember when this was - I was old enough to be dabbling in sarcasm, but young enough to think this idea was really cool. I still remember one verse: "Soaring high with dreamer's knowledge / Of the worlds that lie before." Awesome. So I turn it in, and of course, my teacher enters it in a contest, which it, of course, won. (Did you read the part about "dreamer's knowledge?" That's gold.) My prize was that I had to read it in front of the whole school. Worst punishment for goofing off in class ever.

So this blog is supposed to be devoted to making stuff and general craftiness, but today I just wanted to share this Mary Oliver poem. The tip of the day is to try something that's good for you, even if you don't think you like it. And don't get sarcastic when you're forced to write a poem. It will come back and bite you.


You Are Standing at the Edge of the Woods

You are standing at the edge of the woods
at twilight
when something begins
to sing, like a waterfall

pouring down
through the leaves. It is
the thrush.
And you are just

sinking down into your thoughts,
taking in
the sweetness of it -- those chords,
those pursed twirls -- when you hear

out of the same twilight
the wildest red outcry. It pitches itself
forward, it flails and scabs
all the surrounding space with such authority

you can't tell
whether it is crying out on the
scarp of victory, with its hooked foot
dabbed into some creature that now

with snapped spine
lies on the earth -- or whether
it is such a struck body itself, saying
goodbye.

The thrush
is silent then, or perhaps
has flown away.
The dark grows darder.

The moon,
in its shining white blouse,
rises.
And whatever that wild cry was

it will always remain a mystery
you have to go home now and live with,
sometimes with the ease of music, and sometimes in silence,
for the rest of your life.

Tuesday, July 21, 2009

Wall Letters


Hello world! Today I'm kicking off my blog, devoted to arts and crafts and ideas for projects. I'm a stay-at-home mom who loves making stuff, and who's always looking for thrifty ways to make her home and family more comfortable, well-decorated, or organized.
The first project I wanted to share is a super-easy one: these wall-hanging letters I made for my little girl's room. I bought the wooden letters at Hobby Lobby for $2-4 each and painted them to match her green, white, and brown room, but they didn't have enough punch, so I decided to scrap them! (Scrapping usually solves problems - it sure didn't fail me this time!) Here's what I did:

1. I picked out five 12x12 inch patterned papers, one for each letter, at my favorite local scrapbook store (Signed, Sealed, Delivered in Rogers - it's a dangerous place for me - beautiful home decor AND scrapbooking goodies). I didn't worry about matching the papers, I just looked for pretty designs that had mint green, brown, and pink in them. If you're going for a more coordinated look, pick papers from the same line, or use the same paper for each letter.

2. So I laid out my paper, face down, and traced the letters backwards onto the paper. (With some of the papers I was careful about the placement so I was sure to get - or avoid - designs. The paper I used for the 'P' had some writing on it that I didn't use, and the first 'N' had some fun flowers that I wanted to arch over the top corner of the letter.) Make sure you buy the wooden letters that have straight edges - if they curve toward the front part it'll be harder to get a clean line. For that matter, make sure you get letters that are less than 12x12 inches if you want to use standard scrapbooking paper.

3. I cut out the papers in the shape of the letters, made sure that they matched up well, and then put the wooden letters aside. I just worked on the cut-out paper until the end when I attached them. I inked all the edges of the paper in brown ink. (I ink paper edges pretty much anytime I cut something out; I think it makes it look more finished, and in this case, tied the mismatched papers together.)

4. Then I looked at each letter individually and let the paper dictate what kind of embellishments I used. Here's what happened:

For the 'P:' I used brads to attach green plastic flowers down the side of the letter. I layered big sequins on some of them, too. This paper was busy and shiny to begin with, so I didn't do much.

For the 'E:' I secured three lengths of ribbon around the letter and added three flowers - the top two are layered and attached with a brad and a button, and the bottom one is a die-cut that I used dimensional paint around the edge to give it more presence.

For the first 'N:' I loved the floral design, so I used the little dots radiating from the center of the biggest one as a guide and glued little rhinestones on. This one took the most time, but it's shiny and I can't resist shiny!

For the second 'N:' I painted chipboard paisleys mint green and brown, and painted clear glitter glue over that. It's subtle, but it lets the other letters stand out.

For the 'Y:' There was already a design in lines and circles running down the side of the paper, so I used that as a guide and embellished with a rub-on ribbon and some dimensional pink dots.

5. After I had scrapped all the letters and let them dry, I put non-permanent scrapbook tape around all the back edges to stick them to the letters. When we change her room decor, I'll just tear off the paper and have the painted letters again, so P will be able to decorate the letters however she wants to.

This is an inexpensive project that covers a good bit of visual space on a wall. It's $2-4 per letter, plus $1 or $2 per page of scrapbook paper (and that's if you buy the patterned paper full price, which I rarely do). I had all the embellishments on hand, so I'm not counting those in my cost total.

The letters came with little teeth hooks on the back and are pretty light, so they're just hanging by tiny nails. Great for me, since I love to change rooms up and hate repairing nail holes.