melshort9.etsy.com

my etsy gift shop, with lots of goodies for new babies and mommas

Saturday, November 14, 2009

I'm Crazy about a Pillow!

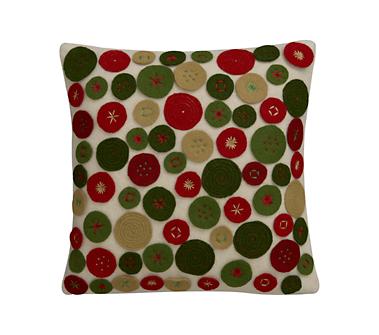
Look at this pillow from Crate & Barrel! I'm crazy about it.

I'm taking a break from working on my last batch of Boppy covers before I officially go on maternity leave (I think I'm going to miss them!), and I was thinking about what I wanted to put in the middle of the kitchen table, now that it's not going to be adorned with my sewing machine and yards of fabric all the time. I'm really looking forward to having that as an actual table instead of a work space. You know, for things like eating meals there. And sitting down to look at a magazine. Or even read a book! Well, I can dream, right?

So looking for centerpiece inspiration, I headed on over to Crate and Barrel's website, and I found this pillow. I have to make it. Just a pillow cover and some felt buttons sewn on. I can do that!

And it'll look perfect for Christmas! I was wanting to switch out some botanical pillow covers that I've had for forever, anyway. So that's my next project. Well, not my next project. I have to finish about six other things before I can start on it. But it's totally on the list now!

And yeah, this is an entire post about one pillow.

Well, I have to add that Penny's with me at the desk and I just looked down and she was gnawing on the corner of the desk. So I don't know what to do with that. Any parenting advice?

Tuesday, October 27, 2009

Little Bits O' Fall


Just wanted to share a couple of pictures of the mantle, all dressed up for fall. The cake stand, pitcher, and trifle bowl were stuffed in a back cabinet in the kitchen. The fleur de lis, French books, coasters and stripey ribbon were in different places in the house. Most of my decorating comes from cannibalizing other arrangements in the house. Some people call it "shopping your house." I like the word cannibalizing. So that's what I call it.


In general, I'm not a fan of fake botanicals, but I have to make an exception for fall-colored leaves. I found these branches at Hobby Lobby (for half-off, of course), and I liked that they have sticks and acorns and little pinecones in them. I'm thinking that for Christmas I'll just pull the leaves and replace them with some red berries. And maybe I'll work in some sparkly, spangly sticks, too! Christmas is a great excuse to glitter-up the house.


And, if you're going to be making/decorating gift bags this Christmas, here's the easiest thing in the world to do to make a personalized bag. These are just plain kraft paper bags with scrapbooking paper cut out just smaller than the front, then inked around the edges and glued on. I cut green strips of paper and just stuck letter stickers on top. I used left-over letters, so I ran out of some of them. Instead of buying more letters (I'm totally cheap) I cut out the outline of where the letter used to be and stuck it on red paper, then cut it out. Insta-letters! (The J an S in Jason and the S and C in Jessica are done like this.) Before I glued the green name strips on the paper, I lightly traced where they would go, then stamped on the background paper so the stamped images would be peeking out from behind the strips. Super-easy, and I just used a few sheets of paper and left-over letter stickers.

Next up: we worked in Cam's room this weekend, so as soon as I get pictures up, I'll show off all the owls. Here's a sneak peek:

Friday, October 16, 2009

Corner-of-the-Living Room Makeover

We're in the process of turning our living room/playroom into a living room/playroom/office. Whew! That's a lot of stuff going on in a little room. The original plan was to do Cam's room half-nursery/half-office. There just wasn't enough space in his room. So we had to find a new home for our computer; we ended up sticking it in the corner of the living room, which totally threw off the balance of the room. I'm hesitant to post this before picture; could my home really be this messy? Am I so used to it that I don't even notice it until it's in a picture I'm considering sharing with the world? In my defense, this was taken at the end of a long day that came at the end of a long week.
Bleh. Not pretty. I'm a big believer in arranging seating in a way that's conducive to conversation, not just against walls, but to do that you have to have things against the walls to draw the eye to the edges of the space - otherwise, your room would be visually reduced to the space of your seating arrangement. So I added some Pier One curtains (on sale, of course), a hand-me-down lamp from my parents, a Lowe's shelf and a printed canvas from Hobby Lobby. I also had to take a hard look at how many toys we were keeping out in the living room. It's a daily battle. Where do they all come from?

Here's what we ended up with:

So now the office space is kind of it's own defined area, and the curtains make the cornice box look more intentional and not like it's just floating at the top of the room.

I'm not in love with the lampshade. I wish it was a dark color. And I would love to have toy storage that blends with the living room, instead of being primary-colored plastic. For that matter, I don't love the computer in the living room. In my ideal world, the living room would be free of screens of any kind. (Don't tell D. He would not approve of my ideal living room.) But this room is a work in progress, like everything else in this house. I know there are crafty things that one can do to change the color of a lampshade, but I'm hesitant to jump into that one. Besides, it would be number 28 on my list of projects to get done in the next five weeks. Speaking of winding down all the projects, I'm going to be closing up my Etsy shop sometime in November in preparation for Cam getting here. So if anybody's thinking about ordering Christmas presents, now's the time. (Or if you're a Short, now is the time you're in full-out Christmas present-buying mode, anyway.)

Here's a fun slipcover I just did for a friend of my sister's. I love how it turned out. I'm thinking about doing an owl one for Cam.

Friday, October 2, 2009

Etsy is Good for my Ego

http://thismamablogrocks.blogspot.com/2009/10/mel-short-shops-review-and-giveaway.html

Check me out! This is a review of a nursing pillow slipcover and onesie that I did for a sweet stay-at-home momma who just started the neatest blog. We're doing a giveaway for one slipcover and onesie set, and there are lots of things you can do to enter; they're all painless. So head over, and check out the other stuff she has - I'm so impressed with all the different information and useful stuff she has on her blog.

Here's a mint green all-minky slipcover I just sold on Etsy - sometimes when I make one of these, I just want to keep it. This is one of those. I think Cam needs one just like it.

www.melshort9.etsy.com


Monday, September 28, 2009

What I Did This Weekend

D and I decided Saturday night that Sunday would be a good day to paint the nursery. I have planned on painting in there for months, but for the longest time it felt like jumping the gun, like it would be weird to have a finished nursery and just be a couple of months pregnant. Then, all of the sudden, I discovered that I had become VERY pregnant, with no weekend in sight to take care of such a big project. So Sunday was our day.
I was inspired by this nursery in Pottery Barn Kids:


Sigh. I would live in Pottery Barn if I could. But I really liked the way the color only went partially up the wall, and I liked that it ended in an interesting motif. I knew I wanted to do orange, and having all of the walls orange seemed a little too much. Also, the ceiling line in our room is weird, and I didn't want to mess with it. (A scary number of my decorating decisions are based on not wanting to mess with things.)

Pottery Barn has a Peter Rabbit silhouette in their room, which is way more intricate than anything I would ever do. I settled for half-circles. Here's how it turned out:


I wanted a motif that echoed the big half-circle window on one wall, since that window is sort of the dominant thing in that room. Oh, how that window has been a decorating challenge. But that's another post. To outline the pattern on the wall, I got a scrap piece of paper and a dinner plate, traced the plate and cut out the circle, then folded it in half. We decided how high up we wanted the scallop pattern (higher than most of the furniture, low enough to not have to mess with the tops of doors and windows), measured and marked the height around the room, and D held up a yardstick while I just traced the half-circle onto the wall with a pencil. I tried to not make it perfectly match up in any corner, so it wouldn't look like I had obviously started at one point.

Here's the big half-circle window:


We went with Behr satin finish paint in "Poppy Glow." (It took almost two gallons, at about $25 a gallon.) This is after weeks of raiding Home Depot's paint chips and taping them up all over the walls to consider. I wanted something bright and fresh, but not overwhelming. Right now it looks perfect for Chester Cheetah's nursery. But I think it'll tone it down to get all the furniture in there, and curtains, and the crib bedding, which is all brown and white and tan. . .


So I think it was a successful venture. It looks whimsical without being too cutesy. It makes me think of a gingerbread house. Not a scary kid-baking one, a fun one.
The whole time we were painting I just kept thinking about scaring away potential buyers when we put the house on the market - is it a normal new homeowner thing to be obsessed with resale value? Probably. We now have one bedroom that's Cheetos orange, and another that's mint green with polka dots. Not everyone's taste.
But I have to say, D was a champ. Painting's not really his thing, but he totally pitched in and did whatever I asked him to do. Basically, I spent the day painting the scallops and he painted the rest of the room. And he went to buy paint and supplies. And he finished the second coat for me after I just crashed. (It's always surprising to me when pregnancy is actually physically limiting, instead of just being a good excuse to go back for more lasagna.) So kudos to D. I think he was just excited about not hearing me talk about needing to paint that room anymore. :)

Next up for that room: furniture, bedding, window coverings that include something to go over that blasted half-circle part. . . It's all going to be owl-themed - lots of browns and creams, with orange and yellow. I have a couple of art projects planned - one big owl painting, and a bulletin board repurposed as a card-displayer. And I'm warning you now, I'm calling the window treatment an "art installation." So, get ready for that.

Monday, September 21, 2009

TMI

Okay, this isn't a crafty post. It's exactly the kind of post I wasn't going to do - it's all about me. And it's personal. So if "Mel's health and wellness" isn't a topic you're looking to brush up on, please feel free to skip this one. I promise craftiness next time.

So, two years ago when I was pregnant I had these weird symptoms (severe itching with no rash) and P was born early with weird symptoms (premature birth, fetal distress, meconium, jaundice). At the time my doctors couldn't figure out what was wrong, and by the time P was born, the focus was on getting her healthy and out of the NICU.

I mentioned the itching to my new doctor at my last appointment (my old OBGYN moved, so this guy wasn't around for all the drama of the last pregnancy), and he started asking questions and ended up saying that it was probably a liver condition called cholestasis. So I got home and googled the heck out of it, and that's absolutely what had happened to me! It's apparently a really rare thing (less than 0.5% chance of getting it) that I don't have any of the risk factors for. (Sorry to end that sentence with a preposition - I couldn't bring myself to type, "for which I had none of the risk factors." I wish there was a way to not end sentences with prepositions that didn't sound stilted. But I digress. . .)

The good news is that I feel a little bit better about my ability to tolerate uncomfortable situations. At the time all this itching was going on, people kept telling me that pregnancy made you itchy and uncomfortable; it's just something you put up with. (Again with the prepositions!) Since this disease doesn't have a rash to go along with the itching, it's easy to get overlooked because a little itching is normal. When you have cholestasis, however, the itching is intolerable. (I can say that - medical officials use that word, so I'm not being dramatic.) I seriously felt like I wanted to rip my skin off, and I didn't sleep for weeks because it would not let up. (See? TMI - I warned you!) So it's good to know that I'm not just a complete sissy who couldn't deal with normal pregnancy discomfort. It's also pretty good timing to be finding out about this. If we had known with P, maybe we would have been able to do something, but since that didn't happen, it's kind of good to not have had this to worry about for the past two years. It usually doesn't kick in until the third trimester, when pregnancy hormones are really goin', so I wasn't really at risk before this. So now that we know, we can prepare and be ready, but not get stressed about it before it's a real concern. And I feel really confident about my new doctor - Mark Pickhardt at Mercy. I've only had a handful of appointments with him, but he seems so competent and he listens and doesn't interrupt, and now, being able to suggest that it was this liver thing that had happened. . . most of the personal experience stories I've read about about women with cholestasis involve the patient stumbling on information on the internet and having to convince their doctors, who have never heard of it, that it's serious and it's what they have. So I'm blessed to have a doctor who's apparently very knowledgeable.

The bad news is that there's a 60 - 90% rate of recurrence, which means we're gearing up for probably having to deal with it with this pregnancy, too. Also, the risk of stillbirth is so great that early delivery (by 36 weeks) is the standard. There are a ton of tests and monitoring procedures that have to be repeated weekly or twice weekly after you're diagnosed, and the goal of treatment is to control it a little bit - there's no easy fix. So P was born at 36 weeks, at which point most babies' lungs are developed, but hers weren't quite ready. And boys develop slower than girls (a fact painfully clear through life, not just in utero), so the concern is having to deliver the baby before he's developed enough. Which is sickening - we spent two weeks with P in the NICU, and it was absolutely the worst experience of my life. To know that we might be in for that again. . . not encouraging.

The funny part is that I've been researching and talking about this so much lately that it's really gotten in my head. You know how if you're thinking about spiders and bugs and creepy-crawlies you start to feel like they're crawling on you? I keep obsessing about itching, and feeling like I itch. Because at this point we're kind of waiting for it to happen. Not in a fatalistic way, just to know that we need to jump to action if it does.

Here are some of the sites where I found the most (and most helpful) information about cholestasis:

www.itchymoms.com
www.mayoclinic.com/health/cholestasis-of-pregnancy/DS01033
www.americanpregnancy.org/pregnancycomplications/cholestasispregnancy.html

Again, my apologies for the lack of craftiness. I'll get back to it soon. I'm looking for a way to scan in scrapbook pages so I can post and brag about those. The problem is that our scanner can't do 12x12 pages; neither can D's at work. . . Any ideas?

Sunday, September 13, 2009

Upholstered Headboard How-To

My entire life, I've dreamed of having a big, four-poster, canopy bed that sits imposingly in the middle of a ginormous bedroom. What I have right now is a little bitty bedroom and a bed on a metal bed frame. Oh, that metal bed frame. We've shopped for an actual bed, with a headboard and foot board, but we've run into some roadblocks. First, our bedroom is so small that any bed that adds length to the bed (like those scrolly sleigh beds) is right out. Also, it's hard to tell what we want to get, since right now our bedroom is a mish-mash of hand-me-down furniture and bedding that is comfortable and functional, but doesn't really reflect us. (And by "us," I mean me. D's contribution to the decor in the bedroom is a Harry Caray figuring on the bedside table. Yes, I sleep with Harry Caray watching over me.) Oh, and a bed isn't exactly in the budget. So the best option for us was for me to tackle the daunting task of putting together an upholstered headboard myself. It wasn't especially difficult, and I'm pretty pleased with the results. Most importantly, the total project cost was around $85. I did a lot of research before I started this project and my process was a mess of steps from lots of different sources that I chose because I liked the way they looked, was able to understand them, and though they'd be the easiest way to do it. The bulk of the instructions came from a website called bejane.com. When I went back to check my link it was gone. Odd. The steps here are modified from mostly that source.


So here is the much-anticipated tutorial on making your own upholstered headboard:

1. Decide on the size and shape you're after. The width is easy - just measure the width of your bed. Our king-sized bed is 77 inches wide, but measure yours - apparently, there are some big discrepancies. A classic rectangle is the easiest option, but I wanted a curvy line at the top of mine. (There are already a lot of boxy rectangles on that wall - two cornice boxes, a big rose picture, the bed itself. . . I wanted to soften up all those lines.) To figure out the height, you might want to painters-tape off what you think you want on your wall and live with it for a couple of days - it needs to be high enough to clear your pillows when they're set up, but if it's too high, it might overpower the room. I made ours pretty low because the room is teeny-tiny.

2. Gather your materials:

1/4 inch plywood that's big enough for your project (for mine: 77 x 27 inches); make sure it's not warped or damaged: about $25 at Lowe's or Home Depot

2 inch foam as big as the headboard (at Hobby Lobby, sold in big rolls): about $25 - if you can't find one piece that's big enough, it's not a problem to put two side-by-side; you won't be able to tell on the finished product

batting to cover the whole thing, plus six inches on all four sides (at Hobby Lobby, with the fabric and interfacing - you can buy the cheap stuff; it doesn't have to be super-soft): about $12

interior decorator fabric - enough to cover the headboard, plus about six inches on all sides (shop at IOMetro Home on Walton and F Street in Bentonville first - they have modern fabrics for $7.95 a yard - that's a ridiculously good price): about $20

buttons to cover (at Hobby Lobby, they're with the zippers and thread in the sewing department - I chose 3/4 inch buttons, and I got six of them): about $6

something to fasten the headboard to the wall - a 2x4, flush mounts, or French cleats - see step nine for details

a staple gun with 1/4 inch or 3/8 inch staples

a roll of butcher paper or wrapping paper, if you're going to design a curvy top

a jigsaw to cut out a curvy top - if you're just going to do a rectangle, they'll make a cut or two for you at Lowe's or Home Depot, so you don't have to make any cuts yourself

a superlong needle to attach the buttons - I used a doll needle

embroidery floss, toothpicks, glue, tape measurer, pencil, marker


3. Cut out plywood in the shape you want. If you're doing a curvy top, measure out the width of the headboard in butcher paper, then freehand the design. Decide which side you like better, fold paper in half (so you'll have a symmetric headboard) and use that side as the pattern to cut out the paper. This is a good point to stop and tape this up to the wall for a few days to figure out if you like the design, and if you have the height perfect. (I didn't do that. I just went for it.) Lay the butcher paper out on the plywood, measuring to the desired top of the headboard and matching that up with the top of your design. Trace around the top, remove the butcher paper, and use a jigsaw (or a dad who's gifted in the art of carpentry) to cut out the design. (The top picture has the butcher paper laid out on it - you can barely see it because it's so close to the color of the wood. The next picture is the cut-out shape in the wood. And my carpenter-dad.)


4. Measure where you want the tufted buttons to go, and drill small holes through the plywood. I used six buttons in a diamond pattern. You can definitely do more than that if you want a more padded look. The more buttons, the fluffier it'll look. If you want to do streamlined (or if you've chosen a fabric with a strong pattern or a monogram) you don't have to do buttons at all. (This picture shows P doing the measuring. I would caution that having a 2-year old do this step isn't your best bet. I know she looks like she knows what she's doing, but her math was a little off. . .)

5. Lay the plywood on top of the 2 inch foam and trace the shape onto the foam - you can use a Sharpie or any marker that will mark on foam. Cut the foam out with regular scissors. (If it's just a touch sloppy, that's okay - you can see mine is a little rough.)

6. Lay your fabric, face down, on a big, clean, open space. (I used my living room floor. So I settled for just any space.) Lay your batting down on top of it. (Fabric and batting should be about the same size.) Oh, lots of how-to sites recommend that you iron your fabric before you start this step. I didn't, and it turned out fine. If your fabric is super-wrinkled, or if it would make you feel better, by all means iron. Then come over to my house. I have some shirts. . . Lay the foam on top of that, then line up the plywood on the top. At this point, you should be looking at a big headboard sandwich with batting and fabric sticking out on all sides about six inches. Peek under the fabric to make sure that it's lined up square - that whatever pattern is on it is going to sit evenly and not be wonky.

7. Gently pull the fabric and batting up over the top center of the plywood and staple on the back on the wood. Go to the bottom center of the headboard and pull and staple there, too. Next, do the center of both sides, so you have four staples in the middle of the four sides. From there, you can flip the headboard over to make sure the fabric hasn't shifted on you and the pattern is straight. (Of course, I didn't check mine. Decorate by the seat of my pants, I do.) Go back to the bottom of the headboard and gently pull and staple your way around, working out from the center of the bottom, top, then sides. When you get to the corners, pull and staple however makes it the smoothest on the front - it'll look like weird hospital corners on the back, but who cares what the back looks like. If you're working with a curved top, you might have to snip the fabric and batting a little bit to make it lay smoothly in the curves - just make sure you aren't cutting fabric that's going to be visible. I think the more staples, the better. Also, I love staple guns. Would use them all the time if I could. (Again, another step not ideally suited for a 2-year old.) When you're done stapling, check one more time to make sure the fabric is straight. Now is not too late to rip it out and start stapling again.


8. Cover the buttons with scrap fabric (there are instructions on the button package - it's very easy). Thread a super-long needle with embroidery floss (all six strands at once) and slide it through the hole you drilled in the back of the headboard. Lace the button onto the needle, then get the needle back through the hole. If you can do that from the front, congratulations. You're probably a decorating ninja. I couldn't get the needle back through the hole, so what I had to do was unthread the needle, then push it through from the backside again, but this time backwards, so the part that came out the front was the eye of the needle. Then I rethreaded it and pulled it through. Kind of tedious, but I was only doing six buttons, so not the biggest deal in the world. I got all the buttons on the headboard before I started tying them. The tying is a two-person job. One person pushes the button into the headboard from the front, making a nice, deep tuft, and the other person ties the embroidery floss in the back. I tied it around two toothpicks, so the knot didn't sink back through the wood, and then I topped each knot with some glue so the thread wouldn't slip. (I used my fancy scrapbooking glue, but Elmers would work.)

9. Time to attach the headboard to the wall. There are a few ways to do this. You could screw the whole thing onto 2x4's, so it looks like it's on stilts, and screw the legs into the bed frame. This is the best option if you're renting or don't want to put holes in your walls. To get the right height on the legs, the headboard should sit one inch below the top of your mattress, and the legs should extend most of the way up the back of the headboard. I also saw a lot of how-to's for making headboards that described using flush mounts, which you can buy at Lowe's or Home Depot, that screw into the wall, and into the headboard, and then the pieces fit together to hold the headboard up. Again, just center the headboard over your bed and let it rest one inch below the top of the mattress. What we did (and by "we" I mean my dad, because at this point we were into "carpentry," which is not my area of expertise, so he took over) was split a 2x4 at an angle, screw one piece horizontally into the headboard, and one piece into the wall, so that the headboard is just resting on that piece, and it's weight is keeping it up against the wall. If you're going to do this, make sure to get the wall piece into studs, and make sure that the screws you use on the headboard are short enough to not pierce through the headboard.

10. Sit back and bask in your decor proficiency. Congratulations. And send me pictures if you try this.
Since I've done this headboard, I keep noticing awesome upholstered headboards in magazines and catalogs. Here are some of the best ideas I wish I had had myself:

I love the line on the top of this one. Interesting, but not too girly.


Monogrammed headboard! I love this idea. Wouldn't have worked for me. (I don't think D would have appreciated a headboard with just my monogram on it. And if it had two, would that just look like a seating assignment?) But for a kid's room? Adorable! (Grrrr - I can't find a picture! I'll keep looking and post it if I can find it again. But you can imagine it, right? It's awesome!)