melshort9.etsy.com

my etsy gift shop, with lots of goodies for new babies and mommas

Wednesday, January 5, 2011

Little Bits O' Heaven

I love, love, love the space I have in my bedroom that I've carved out as an office. Lots of fabric and paper and tools and supplies in that place. All my favorite things. What I don't like is that, because it's a pretty small space, the desk has to face the wall. Or rather, I have to face the wall when I sit at the desk.

Here's my solution: we hung a printer's tray, which I've had forever and am crazy about but never knew what to do with, above the desk. I filled it up with some functional bits and pieces, like stamps and buttons, and some decorative memorabilia. I love looking at it now because every little box has a story behind it.

I laugh every time I see this Chinese fortune cookie slip. "The love of your life will appear in front of you suddenly!" it says. It makes me think of the time that D and I had first started dating, when he jumped out from behind a door with a quilt over his head to scare me. It worked. He had no idea how much I hate to be scared. He knows now. :)

Snow White is for that blasted Halloween costume that I stayed up all night making.

The sheep is for my favorite quote from French literature, "Revenons a nos moutons." Which probably only means anything to me.

I'm not planning on doing any work with those oil pastels any time soon, but it makes me happy to look at them.

(Yes, that's a stamp of my face in the corner. What, you don't have a face stamp?)

The high-rise building tag and snowflake charms remind me of a recent and very special trip to Chicago.

I mean, it's not ideal for one's work desk to face the wall, but I guess if you have to, you might as well put up something that makes you smile. But watch out, because it's easier for someone to jump out with a quilt over their head and scare you if your back is to them.

Monday, November 29, 2010

It's Beginning to Look a Lot Like Christmas!

Lots of exciting things going on around here! Christmas is coming - every year it's a battle to hold out until after Thanksgiving to pull out all the Christmas decorations and cover the house with glad tidings and cheer. And lots and lots of garland. My favorite decorations are the sentimental ones. It wouldn't be Christmas without Santa and Mrs. Claus, who were made by my sweet Granny. Mrs. Claus had a pretty big scare this year - apparently ceramic figures don't mix well with a two-kiddo house. Cam knocked her head clean off. Fortunately, neither of the children seemed too horrified by the event, and I just glued her back together. Granny wouldn't have minded at all.


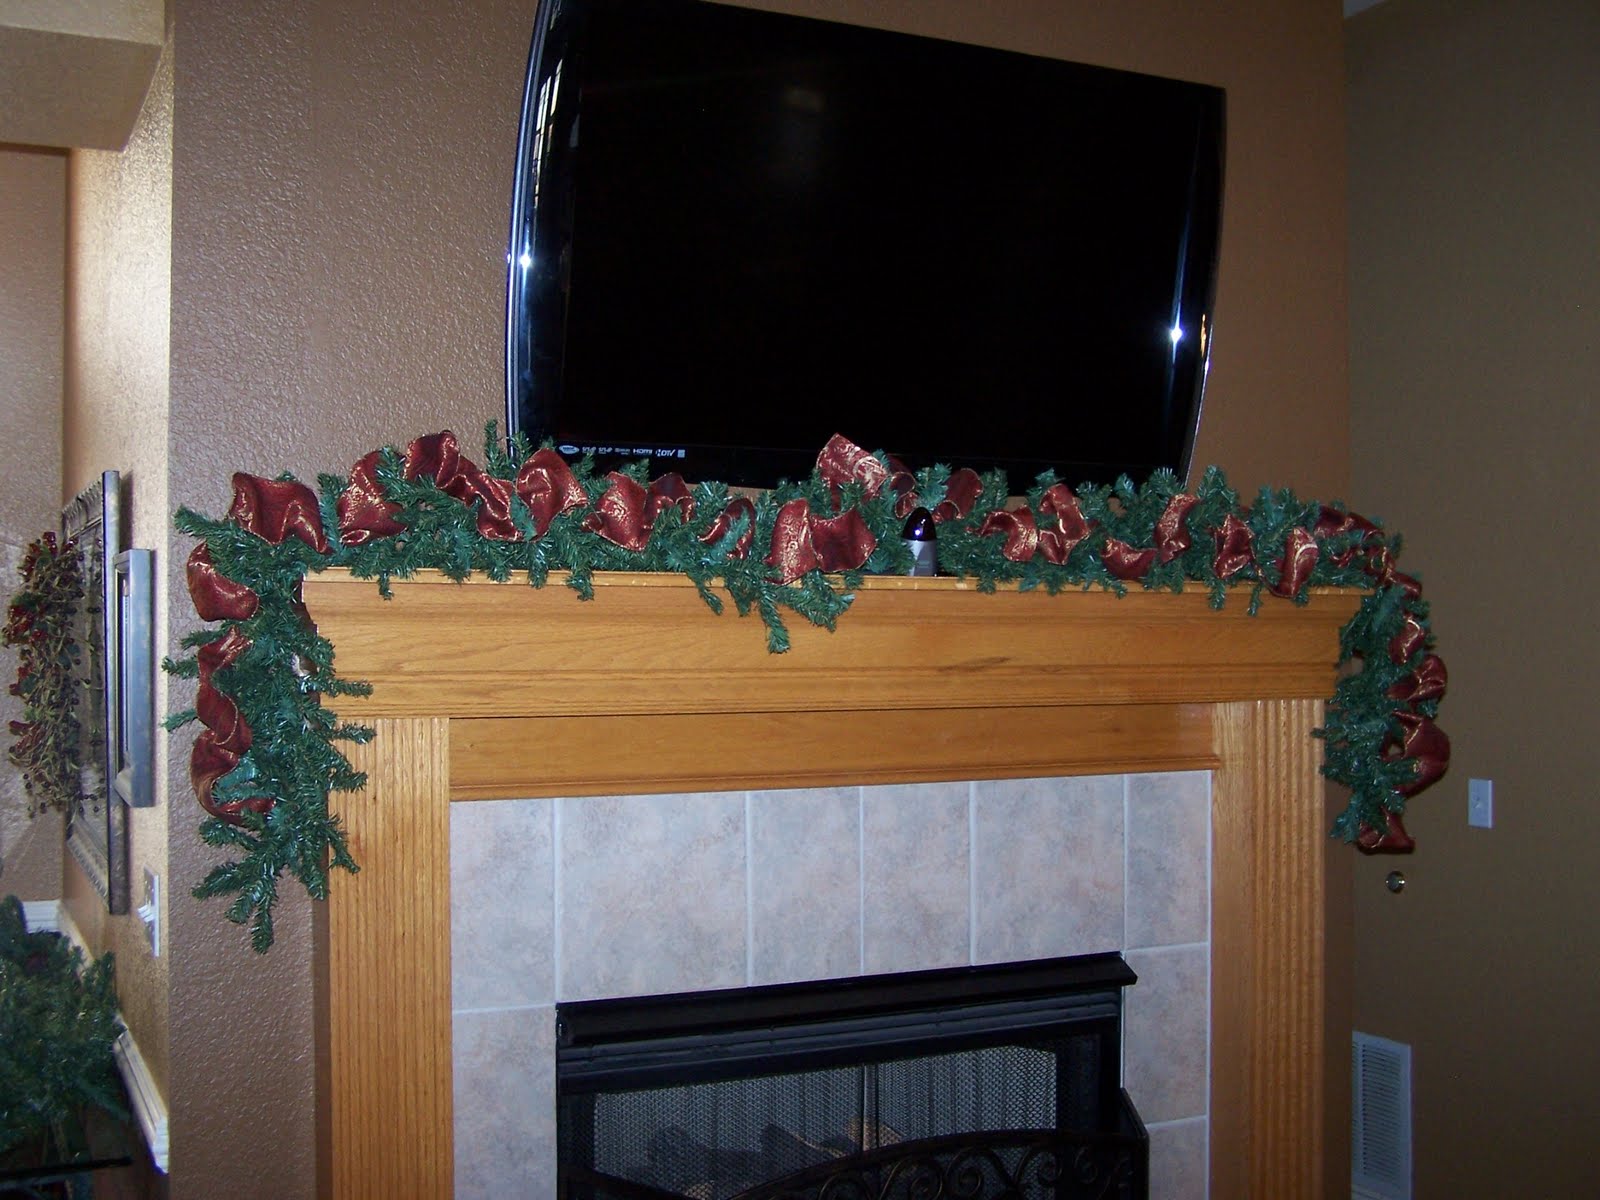
Gotta love big, wired ribbon. This year I mashed it in with some garlands to try to take some emphasis away from the giant TV above the mantle. Does it work?
Sigh. No, I didn't think so.
Here are our built-ins, with little Christmas-y bits tucked in here and there.
I traded out the pears that live in this bowl for some shiny ornaments.
My Gordman's clearance candle holders, that this fall were pumpkin stands, are now Santa stages. Or maybe they just had the Santa-lympics, and these are the winners' podiums. What do you think Santa's national anthem would be?
Penny has been waiting all year to get out the One Fish, Two Fish, Red Fish, Blue Fish ornament. She loves, loves, loves it. When we put away the decorations last year, she mourned over the loss of this thing.

Visions of sugarplums dancing in her head? No. . . I know that look. Something far more diabolical is going on in there.

In other news, my blog just got a make-over! Shalon, of Pretty Lovely Design, hooked me up with a whole bee-themed scheme! I love it - my name and my momma's name both mean "bee," so it's a very meaningful logo for me. What do you think?

Wednesday, September 29, 2010

DIY Lightbox


Hello all! They're both napping, so I wanted to share a quick project I did a few days ago.

(Mostly, though, I want to avoid housework.)

I had some brand-new white onesies sitting around and decided I had better do something with them quick - before Mr. Man got too big to wear them!

Now, I've had a much harder time doing clothes for him than I did for P, because Mr. Man's daddy wouldn't be happy with me if I sewed flowers and bows and ribbons and unicorns and stuff on his shirts like I want to. What do boys do for embellishment?!?

So I settled for my favorite quote from a children's book. I found a font I liked at dafont.com, typed it up and got the size and layout how I wanted, and printed it out on a sheet of typing paper.

Now, here's the lightbox part. I put the paper inside the onesie, put the onesie on a glass table, and put a lamp under the table, so it would shine thought and I could see the letters clearly. Then I just grabbed my fabric paint, a tiny, stiff brush, and traced. The whole thing just took a few minutes.


See how dark it is outside? No, I'm not crafting after-hours. That's before the sun rises. My children wake up ridiculously early.

The font is Mandingo.

He's looking at his sister in this picture. I think he likes her.

Now I'm working on a Halloween top for P. I'll post it soon!

Friday, September 17, 2010

Mmmm, Comfort Food

Big, emotional day for me. Lots of highs and lows. Among the highs: finding my brother-in-law's birthday present that I had hidden (a little too well) in a frenzy of cleaning before a party. Happy birthday, Steven - a month late. Among the lows: trying to get a faulty product issue resolved and having to face off with a bully over the phone. Reminded me of teaching high school - the kids who just come at you with such a negative attitude that you can only wonder what made them feel so insecure. It's a little more jarring coming from a grown man, though. I keep reminding myself that everyone's fighting his own battle, but I still wish this guy had acted like a decent human being. Sigh.

So, a day full of big smiles and more tears than necessary calls for comfort food. Comfort food wrapped in piecrust, served in a ramekin. Ramekins are awesome! Have you ever been served anything in a ramekin that wasn't heavenly? No, me neither.


We tried this recipe last week and loved it. It's another Real Simple magazine "Fake It, Don't Make It" recipe, this one from September of '04. Now, I must reveal why I have these random old recipes lying around. Whenever I see a recipe I like, I tear it out, hole-punch it with one of my numerous hole-punches (why do I believe I can't live with fewer than 3 three hole-punches?), and slide it into a notebook that I keep with my cookbooks. Then, when D and I are meal-planning for the upcoming week and nothing is really sounding good, we bust out the notebook of sounds-good-we'll-try-it-someday recipes. After we try one, it goes in the trash if it's not a hit, or gets copied onto a notecard if we'd like to see it again, and stored in my notecard box, which is my go-to recipe storage place. Wow, that sounds like a high-maintenance system! But it's really not. Well, maybe it is. But it works for high-maintenance me. Now on to the deliciousness.


Individual Chicken Potpies

8-ounce bag frozen mixed veggies (we used a Steamfresh - it was great)
2 refrigerated piecrusts
10 3/4 ounce can cream of chicken soup (who decided that 10 3/4 ounces should be a standard amount of anything?)
1/2 cup milk
2 cups chopped cooked chicken or turkey (get a rotisserie chicken from Wal-Mart and shred the beast - the white meat is around 2 cups)
1/2 tsp garlic salt
1/2 tsp black pepper

Preheat oven to 375. Defrost the veggies in microwave for about 3 minutes. Cut two piecrusts into quarters, for a total of 8 pieces. Coat the inside of four ramekins with vegetable cooking spray, line the bottom of each with a quarter of crust, mold it to fit. In a large bowl, stir together the milk and soup; add the veggies, chicken, garlic salt, and pepper; mix. Spoon the mixture into the ramekins (we had some leftover mix), and top each with a piecrust quarter. Pinch the edges together, folding the extra up on top. Channel your grandmother while you cut vents in the top (because nothing's more grandmotherly than cutting vents in the top of piecrust - it's a fact). Place on a baking sheet and bake 35 to 45 minutes or until golden brown.

Bon appetit!

Speaking of bon appetit, if you like cooking, or French things, you've probably already seen Julie and Julia. But if you haven't, check it out. While we're on the subject of movies, you should avoid The Ugly Truth. I wanted there to be anything redeeming about that movie, but there wasn't. Alas.

Now go eat some piecrust!

Tuesday, September 14, 2010

Yep, It's a Slipcover

When we moved into our new house, I decided that instead of reds and greens as accent colors in our living room, I wanted to go with blues and yellows. Great! On a budget of approximately $27. Not so good. Especially since our loveseat is a nice, mossy green color. (I bought this piece of furniture seven months pregnant. Do not buy furniture when you are that pregnant! You will not make good choices!) This loveseat is comfy, but it definitely wasn't fitting in with the new turquoise and teal accents that were making their way into the living room. I've always had the idea that I could sew slipcovers for furniture, so I decided to try it out.

Now, I was concerned, because I have also always had the idea that I could cut hair, until one horrible evening a few years ago when I tried my hand at my sister's hair. With Motown blaring on the stereo, I slowly watched in fear as I hacked her poor hair to death. (Have you ever been in a wreck? It was like that - a slow-motion I-can't-believe-this-is-happening-right-now-make-it-stop kind of experience.) I was assured by the hairdresser that we both went to at the time that I did not, in fact, have the gift of haircutting. And that I was to never try that again.

There is an e-book at pinkandpolkadot.blogspot.com that's super-helpful if you just need some motivation to get started. No patterns, exactly, but lots of information and encouragement. Here's part of the intro:

"I want women to make their homes beautiful and encourage them in the process to not live by
fear, but believe THEY can do it. Don’t be afraid to cut fabric. Don’t be afraid to just begin somewhere and on some piece of furniture that you do not love right now. Just go for it."

Yes! Yes, I will buy 10 yards of fabric, drape it all over a piece of furniture, and cut and pin and pin and cut and sew and welt and sew until I am ready to break up with my sewing machine. And that's serious. My sewing machine and I have been on solid terms for about 18 years now.


Here's the basic process:
1. Go to I.O.Metro Home and buy lots of upholstery fabric. (No, I'm still not a paid advertiser. Just a devoted customer.)
2. Wrong-side out, lay it over the sofa in the general area it'll end up covering.
3. Tuck and cut and pin where you'll sew the seams.

4. If you're doing welting (which I totally recommend), you have to pin it in while you're adjusting.
5. Drag the whole thing to your sewing machine and sew, sew, sew wherever you've pinned.

6. Put it back on the sofa, adjust and re-sew if needed, and pin on the skirt. Then sew, sew, sew the skirt on.

That's it!

I won't get into all the details. If you have the feeling that you could do it, you probably can. I will share some things that I'll do differently the next time:


* Be sure to get a fabric with no stretch at all. It's a beast to work with that much fabric to begin with, and if it has any give, it'll stretch out of shape while you're sewing it.
* Leave lots more fabric to tuck than you think you'll need.
* Because there's so much fabric, next time I'll set up my sewing machine on a big table instead of the desk. I spent as much time wrestling the fabric to stay put as I did sewing.
* Next time, I'll definitely hand-baste while the thing's still on the sofa instead of just pinning.
* I'll do a more decorative skirt next time, too. For this one I just did box pleats on the corners and in the middle front, and that looks a little plain to me now.

So now we have a loveseat that's a nice, neutral mushroom color. It looks lovely with the turquoise and teal accents, and when the inevitable kid-messes happen on it, I can just whip it off and clean it up. Overall, I think it's a totally do-able project, and something that I'm kind of excited to do again. Maybe our slipper chairs could use a face-lift. . .

Friday, September 10, 2010

Calzones

Gotta share this new recipe that we tried last night. It's rare that there's something that's a win with everyone in the family - and this got rave reviews from all of us! It's modified from a Real Simple recipe from 2006. And it's a "Fake It, Don't Make It" recipe. I like those. :)

Calzone

Ingredients:
box of Jiffy pizza dough mix*
flour for work surface
1 cup ricotta
1 cup shredded mozzarella
3 tablespoons grated Parmesan
one package ground turkey sausage*
2 tablespoons olive oil
1 14ish ounce jar pasta sauce (we love the Classico Florentine Spinach and Cheese)

* The original recipe calls for a one-pound bag of refrigerated pizza dough, which we couldn't find, so we used Jiffy. It also wanted us to use 4 ounces of roughly chopped salami. I do not eat salami. So we used the turkey sausage.

1. Heat oven to 400.
2. Mix the Jiffy mix with 1/2 cup hot tap water. Cover 5 minutes and let rise.
3. Brown the turkey sausage and drain.
4. Divide pizza dough into four equal portions, and roll each one into a circle (about 7 inches), and put dough on baking sheets lined with aluminum foil.
5. In a medium bowl, combine ricotta, mozzarella, Parmesan, and turkey sausage.
6. Spoon cheese mixture onto pizza dough rounds. Get a little water on edges of dough, then fold in half and press edges to seal. (We ended up with way more filling than would fit into the calzones. Don't know what I did wrong. But it's fine if you have someone in your family who will nibble on the leftover filling while you cook.)
7. Brush the top of each calzone with the oil.
8. Bake until golden, 20 to 25 minutes. Serve with warm pizza sauce on the side.

Bon appetit!

Sunday, September 5, 2010

Labor Day Sale


Head over to melshortshops! I've finally gotten around to sewing up some new covers out of fabrics that I've fallen in love with, but have just been sitting around my house for a while. I'm so pumped to finally have them in my shop, I'm throwing myself a Labor Day party! Well, it's more like a sale on all my new stuff. . . But that's like a party, right? Anyway, it's just for Monday, so check it out!

Thanks for putting up with my shameless self-promotion! To reward you, here's a picture of the adorable-ness that lives in my house: